back ground image

Thursday, December 23, 2010

Christmas 3D scene!


This was a fun one, and only took about 15 minutes! But it isn't foldable, so it turned out to be less of a pop up card, as originally planned, and more of a 3D pop up scence.


All images were cut from the Christmas Cheer cartridge. The trees in the back were embossed to add texture, the mustache and hat trim were applied with pop dots to give it some demenstion. I used paper tabs behind the Santa's and two of the trees to make them stand out from the trifold. The stars are strung from the ribbon and attached behind the santas with glue dots.

Entered in:
Stampin for the weekend: Christmas Challenge
For funn challenges: Merry Christmas
Papertake weekly: Anything Goes
Allsorts Challenge Blog: Anything goes
Fussy and Fancy: Snow

Seasons Tweetings

Just a simple season card with a fun message.
 "Seasons Tweetings"

Bird paper: scrap
Bird cut from Create a Critter
Branch cut from Serenade
Card paper: DCWV Christmas stack

entered in the ABC challenge: K is for Keep it Simple

Monday, December 13, 2010

More paper doll scenes

My niece requested more paper doll background scenes for Christmas. I have been going crazy making these sets for her. I LOVE the paper doll cartridge! She has a full set of paper dolls and also a fairy tale castle scene.
(see link: http://carrieannscreations.blogspot.com/2010/04/paper-doll-extravaganza.html)


I was hit with the Christmas spirit and decided to make a nativity with all the characters as well. I love this one. I think I am going to make one for my daughter as well.


Here is a glance at the back of the trifold scene. I think I might have explained how I make these in the link above.

I think I will do a tutorial sometime about how I assemble these....
:-)

Non-paper project

At times I set down the paper and glue and pick up another material to craft with. I have been wanting to make new stocking to go with my Americana/Primitive decor for quite some time now. I found the time and in a few hours over two days time this is what came out.


Saturday, October 16, 2010

Haunted House

 I started with the haunted house from the October 31st cartridge.I added yellow behind the windows to make it look like someone was home. Then accented the doors and roof lines with purple and of course a bit of stickles because sparkles make everything better. :-)
 I was having some much fun I decided my house needed a yard and some spooky trees!
And of course, a haunted house is not complete with out some bats flying out of the top.

I cut off one of the branches and moved it to the front so the tree was a bit more 3D. I do have a raven on the front branch of the tree, but it is hard to see. In hindsight I wish I would have cut it in a dark gray so that it contrasted a bit better.

Monday, October 11, 2010

Scrapbook pages

I got a 3 hour block of time to scrapbook today. I was heavenly! I worked on my daughters pages.

This is rather simple. I might add one or two small pictures. The paper and stickers are Heidi Grace.

Same with this one, I just feel that it needs more. I love the concept though. Maybe a journal spot and some stickers will finish it off. Guess I will have to head to the store! (Yippee!)
Still need to add the journaling spot to the bottom corner. But this would have to be one of my favorite pages i've ever made. Heidi Grace paper and bumble bee sticker. Cricut Pooh font cart for both the words and characters. Pooh and Eyore were cut at 2 1/2 inches. So some of the parts were so little that I had to use a tweezers to pick them up and glue them down!
.

Sunday, October 10, 2010

Turkey Time!

Thanksgiving is drawing near. Thought I would make a few cards up to send to people that I don't see on this holiday.
 Turkey from the Create A Critter cartridge. The paper was left over from last season. (I believe it was DCWV?)
Inside I used a $1 Micheals stamp. (I get in trouble in their $1 bins!) Just simple leaves falling to add to the all theme.

Entered in:
cricut Cardz Challenge-Thanksgiving or Turkey theme
For Fun Challenges-something you have never used (For the first time I used a sponge applicator to ink/distress the sides of the card,and it works really well too!)

Mini album

I am catching up on my scrapbooking. This is a mini album from our July vacation. I love mini books. They really give me a chance to go all out and use multiple papers/stickers/themes allin one book. But at the same time I don't bog down my large 12x12 scrapbooks with multiple pages from one event. I win both ways!


Skunks from Create a Critter


 This is a close up of the waves. They are cut from Alphaballo and then stickled. The Mom & Me lettering is drawn with markers on the Cricut. and is also from Alphaballo.

All the stickers are from my stash. I've had them for a long time and cant remember where they are from.

Finally, this is the fron t cover. I cut the letters from chipboard and then covered them in paper.I layers and glue the letter together tho create the word cover then added the embelishments.

Entered in:
Oh la la challenge blog-nothing floral
Spoonful of sugar- sparkle and shine
Polly craft- anything goes

Friday, October 1, 2010

"Witching" you a happy birthday.

Playing with my October 31st cart. Can't get enough of it! So I made a quick, fun birthday card for my mother in law.


Wednesday, September 15, 2010

Catching up on scrapbook pages....

Made a few more scrapbook pages. I want to stay as current as possible with my daughters book as possible. These are a just a quick glance at the newest pages I made.

Say cheese!
 There is a empty space in the middle, I stil have to add my jounaling spot there, but at least the page is put together. Plaid paper is DCWV, and the phrase, mouse, camera, and cheese all came from the Create a Critter cart.

Yummy Watermelon!
I think every kid has to have one of these pages. The paper is DCWV. I love that the watermelon is pink instead of the traditional red. I used Doodle Charms to cut out the large melon slice and the border. To keep the light fun feel of the page I wrote the journaling spot in white pen. Such a fun page to make!


Bubble Bath Queen.
The always popular bubble bath pictures. I did a very simple layout here. The paper was cute (a freebie from a friend, don't know the brand, sorry) I wanted to show off the ducks so I did a simple mat and tack job then added two duck stickers. Sometimes simple works very well.

Wednesday, August 11, 2010

Elegant Birthday Wishes

I wanted to make some more elegant /adult themed birthday cards. I am very happy with the way these turned out.
Two different cards, but they happen to coordinate.


I used the cricut marker to write Happy Birthday, the filled it in with pink Stickles. I really am beginning to love stickels and the versitility they provide!


When I lay two papers together I don't always like the hard line. Tying a ribbon on the line softens it up. I love that this ribbon also says "celebrate".

Materials used: DCWV pink flower paper, embossing cuddle bug happy birthday folder, stickers? ribbon?

Challenges entered:
Challenge up your life - Celebrations
Penny's Paper Challenge - Anything Goes

Saturday, August 7, 2010

Having fun with a childs year cartridge.

So here is a usual crafting though process for me: 
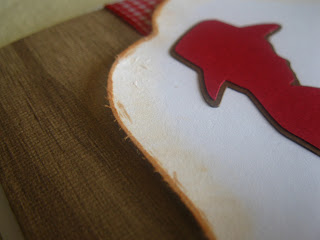
..I went into my craft room knowing I was going to make cards and not knowing much else. I browsed my cartridges and took out my childs year since it had been awhile and I had some cute ideas. Then I look at my paper. This DCWV paper with the wood grain makes me think it needs to be boy themed. I search and find the cowboy and boy riding a horse. Perfect! Now to pick colors, boys and cowboys... red and brown work. But it needed more. The shape I laid the images on is from the Sweetheart cartridge (cant' remember the name of the shape off hand). Then I decided I needed just a bit more to break up the texture of the paper... Ribbon! The red and white gingham looks prefect to me. I wrapped it around the front, mounted the image on foam tape to float it above the ribbon, then cut the Sweetheart Image shape in both shadow in red then  regular size in white. I found that adding coordinating colors and shapes inside the card, instead of leaving it blank, makes me feel like the card is completed....
And that is the end of my strange crafting thought process.
And I now have a set of completed cards.

This is a close up of the little detail that I thought was fun. I inked the edges of the shape. But didn't really like the way it turned out. So I was going to use by blending pen, hoping that it might smear or blend in the ink. It didn't work too well, it actully ended up tearing up the little fibers out the paper, but it made it look like distressed wood, which matched the overall look of the card.

Wednesday, August 4, 2010

Happy Anniversary Jim and Ange

Mom requested I make a wedding anniversary card for Jim and Ange... and what do you know, there is a challenge for anniversary's this week! This is also my very first flip flop card. I like the way it turned out. I will be making more. They are such fun cards!


I used the Sweethearts Cartridge to cut all the images, the paper is DCWV, and the pink ribbon is a Micheals dollar bin grab.

Challenges: Crafty Creations Challenge: weddings and anniversary


Monday, July 26, 2010

Christmas in July (Layout)

Inspired by all the Christmas in July challenges going on I decided to pull out my daughters 1st Christmas pictures and scrapbook them.

Here is my daughters first meeting with Santa.


I am really excited at how well this turned out. I knew I wanted to use the Night Before Christmas paper. Everything else just fell into place after that. After I got the picture, the word Santa, and the tag for journaling on, it still seemed flat to me, so I added the ribbon to "hold" the journaling tag, and cut some of the key words from a second piece of paper and mounted them on black and raised them with foam tape. That added just enough dimension to finish it off.

Santa Letters- Plantain Cartridge
Tag and Santa Silhouette- A Childs Year
Paper- My Minds Eye

Challenge entered:
Candy Shoppe Designs- Chrismas in July
Miami Doodles- Anything Goes
Flourishes Times Tuesday Challenges- Christmas in July
Creative Inspirations- Anything Goes

Sunday, July 25, 2010

Cup cake card challenge

I finally had a bit of time to enter some challenges. This time I was able to qualify for 3 challenges with one post! So exciting. Here are my cards:

Card one: Zigzag Cupcake Birthday Card
Card two: Mini Cupcakes Birthday Card


Materials:
Paper-DCWV
Cupcakes- Doodle Charms Cartridge
Cake stand- Celebrations Cartridge

Textures:
I used my cuddlebug to add dots to the cupcakes for some texture.
I used stickles to create sparkles on the cake stand and candle flame.

Challenges:
Cricut Cardz Challenge- cake or cupcake
Crafty Creations Challenge- Happy or sweet
ABC Challenge- Z is for zig zag card